Sunday, 22 November 2020

SHOT PUT EVENT πŸ₯Ž

  Ψ¨ِΨ³ْΩ…ِ Ψ§Ω„Ω„َّΩ‡ِ Ψ§Ω„Ψ±َّΨ­ْΩ…َΩ†ِ Ψ§Ω„Ψ±َّΨ­ِΩŠΩ…

Hello everyone πŸ’œ

How are you today? Hope that you guys are doing well during this pandemic. Please follow the SOP as the case is rising. So, I'm going to talk about Shot Put. Shot put is a track and field event that involve putting (pushing rather than throwing), a heavy spherical ball as far as possible. 

HISTORY:

  • The homer mentions competitions of rock throwing by soldiers during Siege of Troy and there is no death records. 
  • But a version of the modern form of discipline can be traced to the Highland Games in Scotland during the 19th century where competitors threw a rounded cube, stone or metal weight behind a line.
  • They believe the shot put originated from the ancient Celtic tradition of "putting the stone" which according to Scottish folklore, it was used by Clan Chieftains to help them identify their strongest men for battle purposes. 
  • The men's Shot Put has been a part of tradition in every modern Olympic since 1896. 
  • While women putter had to wait until 1948 before they could compete in the game. 

EQUIPMENTS:

  • Shots Put. [Men : 7.26 kg] [Women: 4 kg]
  • Sport Shoes/Spike.
  • Toe Board.
  • Shot Put Circle.
  • Tape Measure.
  • Flags.

STYLE & PHASE OF SHOT PUT:

  1. Standing Throw.
  2. One Step Slide.
  3. Parry O' Brian/Glide.
1) Standing Throw.
i.a) Bullet Grip
There are two types of hold the shot which are hold with three fingers and hold with five fingers. 

i.b) Preparation.
Participants must standing at the front of the circle. The left shoulder facing the direction of the throw. While the bullet are place near the neck and under the ear. He /She must lift the arm almost horizontally and the elbow direction are outward. 

ii) Gliding.
In this style, there is no gliding technique applied.

iii) Delivery.
The right foot must be lower than left foot. Knead the waist and push with the right hand forward across the body. Simultaneously pull down the left hand and straighten your legs. The right hand in the direction of the lash, the elbows elongated outside and far from the body.

iv) Recovery. 
The position of the front and back leg is same in the throwing or delivery phase. 

Google Image.

2) One Step Slide.
i.a) Bullet Grip
There are two types of grip that can be use which are hold with three fingers and hold with five fingers. 

i.b) Preparation.
Athlete must standing at front of the circle, backing up the throwing area. The bullet are placed near the neck and under ear. While the arm are lifted almost horizontally and elbow position must be outward. 

ii) Gliding.
In this style, athlete need to do gliding where the weight on the left leg, the right foot is moved to the center of the circle by crossing the left leg.

iii) Delivery.
Athlete must lower down their right foot and knead the waist. After that push with the right hand forward across the body. Simultaneously pull down the left hand and straighten the legs. The right hand must be in direction of the lash and the elbow elongated outside far from the body. 

iv) Recovery.
Brought the back leg to the front of the circle and at the same time the front leg is taken back. 


Google Image.

3) Parry O' Brian/ Gliding.
i.a) Bullet Grip.
The grip for this style is same with the others which have two ways, hold with three fingers and five fingers.

i.b) Preparation.
In this phase, athlete need to stand in front of the circle and backing up the throwig area. The left shoulder facing the direction of the throw and bullet must be placed near the neck and under the ears. While arm lifted almost horizontally and elbows outward.

ii) Gliding.
Gliding phase are needed where athlete must inclined the body, the right leg is bent and the left leg is kicked to the front of the circle. The right foot are moving to the center of circle.

iii) Delivery.
Athlete need to lower their right foot, knead the waist and push the shot with right hand forward across the body. Simultaneously pull down the left hand and straighten the leg.  Right hand in the direction of the lash and elbow elongated outside and far from the body.

iv) Recovery.
After that, the back leg must be brought to the fron of the circle and at the same time the front leg is taken back. 

Google Image.


RULES & REGULATIONS:

πŸ’₯ Upon calling the athlete's name, they have 60 seconds to commence the throwing motion.
πŸ’₯ Athlete may not wear gloves just taping the fingers.
πŸ’₯ Must rest the shot close to the neck and keep it tight to the neck throughout the motion. 
πŸ’₯ The shot must be released above the height of the shoulder by using one hand. Cannot throw           overhead motion.
πŸ’₯ Athlete may touch the inside surface of the circle or stop board, but they cannot touch the top           or outside of it. 
πŸ’₯ The shot must be land in the legal sector of the throwing area.
πŸ’₯ The athlete must exit the throwing circle from the back half of the circle. 

Yeay..... We're done with the Shot Put. I hope you guys understand on what I'm delivering. See you soon on the new topic. 😘

Friday, 13 November 2020

HURDLE EVENTS ➖

 Ψ¨ِΨ³ْΩ…ِ Ψ§Ω„Ω„َّΩ‡ِ Ψ§Ω„Ψ±َّΨ­ْΩ…َΩ†ِ Ψ§Ω„Ψ±َّΨ­ِΩŠΩ…

Assalamualaikum and hello to everyone. Ugh, I miss you guys a lot. It's been a long time since my last post. Okay, now I'd like to share something interesting with you Guess what?.............................. It's HURDLE Event ❗❗❗ Do you know exactly what it is? Let me tell you that hurdling is a highly specialised type of obstacle racing. In hurdling competitions, barriers known as hurdles are set at measured heights and distances. Every competitor must pass over the hurdles passing under or deliberately knocking over hurdles will result in disqualification.


HISTORY:

  • In 1886, there are two major hurdle races for men appeared in the middle of 19th century in England.
  • Around 1830, hurdle races of 100 yards were run over heavy wooden barriers. The distance was extended to 110 meters in 1888.
  • In 1900, the 110 meters and 400 meters event was introduced. 
  • Event for women was held in 1926 at a distance 80 meters.
  • After that, 100 meters was introduced in 1986 and followed by 400 meters in 1971. 

EQUIPMENTS:

  • Starting block.
  • Hurdles.
  • Flag and cards.
  • Stopwatch.

TECHNIQUES

1) The Start & Approach.
🎈 First hurdler 7 or 8 stride away from starting line. 
🎈 Must come upright at the third or fourth stride.
🎈 Starting block spacing will have to be slightly altered.
🎈 Take-off foot is placed in front of the block.

2) Hurdle Clearance.
🎈 The athlete must attack the hurdle and aim to clear it.
🎈 Clear the hurdle approximately by 17cm to 18cm as quickly and efficiently as possible. 
🎈 Raising their center of  gravity only a little more than a normal sprint action.

3) Leg Action.
🎈 The last stride of the approach to the first hurdle is shortened in order to allow the take-off leg to move rapidly under the hips. 
🎈 This is to ensure that a fast effective drive can be made across the hurdle. {1}.
🎈 The take off distance is 1.98 meters to 2.29 meters from the hurdle. 
🎈 The body's center of gravity is ahead of the foot on take-off. {1}.

A) Leading leg.
  • The knee must be picked up fast {1}.
  • The lower part of the leg is left low and extends once the knee reaches the height of the barrier {1&2}.
  • The foot of the lead leg reaches the highest point which is 15cm to 30cm in front of the hurdle rail.
  • As the heel of lead leg passes the barrier it must be pulled down and back to land under the body. {3&4}.
  • There is no necessity for the lead leg to be straight over the top of the hurdle. {3}.
  • The leg straightens as it descends towards the ground. {4}.
B) Trailing leg.
  • The trailing leg drives the body at the hurdle as the lead leg rises. {1}.
  • The recovery of the trail leg must begin from well behind the body if the drive is to be completed.
  • The athlete should feel the trailing knee sweeping wide and flat over the hurdle. {4}.
  • As the leg crosses the hurdle, the foot must be cocked at the ankle so that the foot does not hit the barrier. {4}.
  • After crossing the barrier, the knee continues to rise and comes round in front of the body. {5}.
  • The trail leg must be pulled through high and fast so that the first stride is speeding {5 & 6}.

Google Image.

4) Arm Action.
🎈 The arm act to balance the body and counter the rotations produced by the legs.
🎈 The arm opposite to the lead leg actually leads the action into the hurdle and pushes/dives forward as the leg rises {1}.
🎈 The other arm should be taken back in normal sprinting action.
🎈 As the trail leg comes round the leading arm swings back and wide to counter the rotation of the trail leg {4}.


RULES & REGULATIONS:

  1. Runners who delibrately knocked down a hurdle are disqualified. ❌
  2. Runners who knocked over a hurdle accidently are not diaqualified. ✅
  3. If a runner knocks down a hurdle with her hand she is disqualified. ❌
I think, that's all for today. Hope this can help you to gain some new knowledge. Till we meet again  and stay safe. πŸ’›


Friday, 6 November 2020

POLE VAULT EVENTS πŸ‘¨πŸ»‍🦯

 Ψ¨ِΨ³ْΩ…ِ Ψ§Ω„Ω„َّΩ‡ِ Ψ§Ω„Ψ±َّΨ­ْΩ…َΩ†ِ Ψ§Ω„Ψ±َّΨ­ِΩŠΩ…

I'm back peeps with Pole Vault topic. Have you heard about this before? Let me guess, you heard about this before but not familiar isn't? Pole vaulting is a track and field event where a person uses a long flexible pole as an aid to jump over a bar. 

Google Image.

The History:

  • The origin was in Germany in the 1850s.
  • Adopted by a gymnastic association in the Lake District region of England. 
  • The first recorded use of bamboo poles was in 1857.
  • Started using steel pole in 1940, the flexible fiberglass and later carbon fibre
History.

The Equipments:

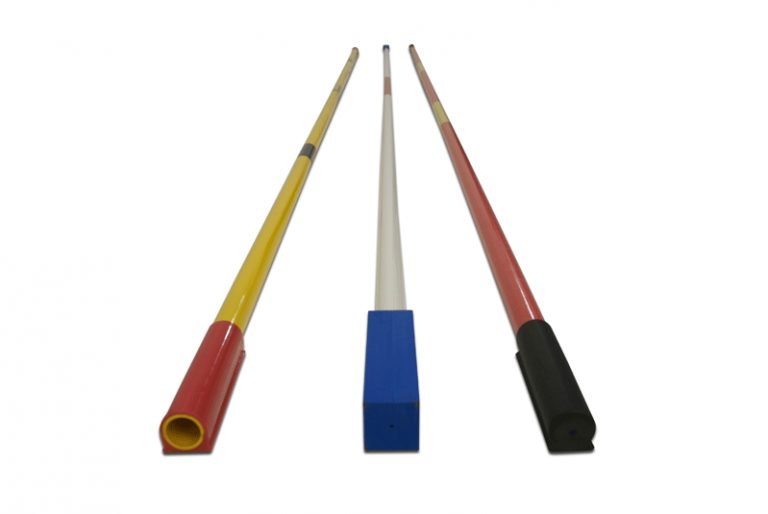
  • Poles.
  • Crossbar.
  • Pole Vault Boxes and Collars.
  • Pole Vault Pit.
Pole vault equipments.

Phases of Pole Vault:

The pole vault technique comprises of the following phases :
  1. Approach.
  2. Plant.
  3. Take-off.
  4. Penetration.
  5. Rock back.
  6. Stretch turn.
  7. Bar clearance and landing.
Google Image.

1) Approach.

Approach phase is important which the vaulter need to maximize kinetic energy by attaining a high horizontal velocity at the end of the runway. The approach run for the novice is 10-12 strides and for the top class runner up to 18 strides from the take-off plant. 


Google Image.

2) Plant.

  • Planting of the pole commences on the next to last contact of the left foot by pushing the pole forward. 
  • Bring the left arm forward. The plant must be high, fast and early.
  • On contct with the right foot, raise the right arm quickly forward and upwards [like the uppercut of a boxer] until the arm is fully extended. 
  • At the completion of the plant, the chest leans into the pole and lead the body forwards. 
  • The plant seen from behind for a right handed vaulter.
  • Planting of the pole commences on the next to last contact of the left foot. 
  • The eyes should be looking between the hands and not towards the box. 
Google Image.

3) Take-off.

  • The take-off foot should land flat-footed on the ground. 
  • The vaulter achieves total body stretch.
  • Both arms must be stretched.
  • Drive the thigh of the non take-off leg vigorously upward [1] until well after take-off took place.
Google Image.

4) Penetration.

  • Push the left arm forwards and upwards and must not collapse.
  • Freeze in the take-off position.
  • The take-off leg should be pushed backwards and kept extended to aid the penetration and to assist the vaulter's swing.
  • The swinging should not be too long because it will reduce the ability to reach an effective extended position on the pole.
Google Image.

5) Rock-back.

  • Draw both legs in to the chest during rock-back [1].
  • Bend the left arm slowly to bring the body and pole closer together.
  • At the end of the rock-back stage, the back is roughly parallel with the ground.
  • The head remains in line with the upper body.
  • The rock-back position must be achieved by the time the pole reaches its maximum bend.


Google Image.

6) Sretch, turn  & bar clearance.

  • Keep the legs parallel with the pole [1]. Keep the body as staright as possible.
  • The lower arm must keep the body close to the pole.
  • The upper arm, which is still straight, should pull directly down the line of the pole simultaneously with the hip elevation and the pole's recoil.
  • The turn commenced through the pull of both arms. Turn to the left.
  • Turn the stomach towards the bar. Push off from the pole with the right arm [2].
  • During the clearance the centre of gravity must be kept above the handgrip. 
  • To assist this, the vaulter must drop his legs by flexing at the hips.
  • Allow the arms to follow the curve rather than pulling them up to avoid the chest from touching the bar.
  • Depress the stoach and turn the elbows outward but not upwards. Land on the back.
Google Image: Stretch, turn.


Google Image: Bar clearance.


Alright peeps, I think that's all for today. If you have any inquiries you may comment below and ask anything. Thank you so much for your visit. See you soon and stay safe πŸ’›


Thursday, 5 November 2020

HIGH JUMP EVENTS 🀸🏻‍♀️

Ψ¨ِΨ³ْΩ…ِ Ψ§Ω„Ω„َّΩ‡ِ Ψ§Ω„Ψ±َّΨ­ْΩ…َΩ†ِ Ψ§Ω„Ψ±َّΨ­ِΩŠΩ…

Hello & welcome back everyone. So today I would like to share about High Jump & Pole Vault events. High jump is a track and field event where competitors must jump over a horizontal bar placed at measured heights without knocking it down. 


Google image.

The History:

  • The first event of high jump was held in Scotland in the early 19th Century.
  • The event was incorporated into the first modern Olympic Games in 1896.
  • Previous elite jumpers techniques was Western Roll, Eastern Cut-off or even Scissors Jump to clear the bar.
  • In the modern era, athletes run towards the bar and use Fosbury Flop method of jumping where they need to leap head first with their back to the bar. 
  • Fosbury Flop technique is more success than other style. 
Google Image : Techniques.


The Equipments:

1) Landing Mats.
  • The landing area must be a minimum mat surface of 3m X 5m X 5m (IAAF Standards).
  • The mat must be check regularly for damage & repair or replace as necessary. 
Google Image: Landing mats.

2) Cross Bars.
  • Using fibreglass crossbar.
  • Check the crossbar regularly to prevent from any cracks. 
Google Image: Fibreglass Crossbar.

How to measure the crossbar?

Measurement for high jump are taken from the top of the middle of the bar. The height is also checked at each end of the bar to ensure that is the level. 

Google Image: The measurement.


Phases of High Jump:

1) Approach Measurement.

πŸŽƒ Firstly, take an arm’s length distance parallel from the edge of the landing mat. Take another 2 steps forward and mark it (Takeoff Checkpoint). Turn to the left hand side, take 5 steps and another 5 steps to left and mark it again (Curve Running Checkpoint). Lastly, take another 5 straight to your right hand side (Straight Running Checkpoint).

Google Image.

2) Approach Phase.

πŸŽƒ To keep the approach simple we will discuss it as having 5 steps on the straight and 5 on the curve. Continue to accelerate in a straight line until you reached the fifth step. Slow down as they approach the transition to the turn. Maintain your speed before making a jump.

Google Image.

3) Takeoff Phase.

πŸŽƒ During the takeoff, athletes will transition from a curved approach to a vertical takeoff. During the takeoff steps the athlete should maintain speed and "stay away" from the bar. Arm action can either continue single arm or be double arm at takeoff. When the athlete plants the takeoff leg, it will need to be braced or ready for the jump. The knee of the penultimate leg will be brought up because of stored energy from the previous step.

Google Image.


4) Flight Phase.

πŸŽƒ During the takeoff the head should have been looking at the far standard. As the athlete becomes airborne, with hips near the bar, the head should look directly back so that the hips will rise over the bar. To get the feet to clear the bar, the athlete will bring their head back to the chest, finally landing on their upper back in the pit.

Google Image.

5) Landing Phase.

πŸŽƒ Land on the mat properly. Touch the mat with your upper back first. After clearing the bar you'll want to land on your upper back and shoulders to avoid injury. The rest of your body will follow and it may feel right to let the movement turn into a backward tumble. If so, relax and try to roll into the tumble. If you tumble, push the roll to either the left or right side of your upper back and put your body's weight over the respective shoulder (rather than directly over the head) so the pressure is distributed away from the neck.

Google Image.

The Drills:


The drills.

Drills video.

Finally, we're done yeayyyyy. That's all about high jump. See you on next simple update about Pole Vault 😘


Monday, 2 November 2020

ELECTROLYTES WATER 🍢

On this topic, I want to share something worth to read. Have you heard about Electrolytes? What is the Benefit? Let's go 🦸🏻‍♀️

What is Electrolytes?

Electrolytes are minerals that conduct electricity when dissolved in water. They are distributed through the fluid in your body and use their electrical energy to facilitate important bodily functions.These minerals play a role in regulating blood pressure, muscle contraction and keep your system functioning properly. 
If you lose a significant amount of these minerals [either by intense exercise, sweating, vomiting or diarrhea] you're going to experience dehydration and feel pretty lousy. And also muscle cramping and spasm. 

3 Big Electrolytes:

1) Sodium.
2) Potassium.
3) Magnesium.


Electrolytes Drinks? What to look for?

Electrolytes drinks come in a variety of forms [tablets drop into water, powder that you mix up, liquid that comes in a regular water bottle]. 

Not all electrolyte drinks are created equal though, so the first thing that you need to do is read or check the labels. One of the example of electrolytes is sport drinks. 

Google Image.


TIPS πŸ’‘:
  • If you're working out for an hour or less, drink H20.
  • If you're exercising upwards of 75 minutes or more [hot condition], then electrolytes drink is a good idea. 

Benefits of Electrolytes:

1) May improve exercise performance.
  • Electrolyte-enhance waters (sports drink) help replenish water, electrolytes and energy lost during exercise.
  • Sports drink are recommended for prolonged exercise and exercise in hot weather.
Google Image.


2) Can rehydrate during illness.
  • Illness such as vomiting and diarrhea can cause you to lose fluid and electrolytes rapidly. 
  • Oral rehydration solutions are recommended for replenishment.
Google Image.


3) Can help prevent heat stroke. 
  • Prolonged exposure to heat puts you at risk for heatstroke.
  • Consuming adequate amount of fluid and electrolytes is recommended to help body stay cool. 
Google Image.


I think that's all for today, I hope you can use or apply this knowledge and enjoy healthy lifestyle. Don't forget to stay fit even when you're at home. #Staysafe 
🀍

Wednesday, 28 October 2020

EXERCISE DRILLS CAN IMPROVE RELAY EVENTS πŸ‹πŸ»‍♀️

     Assalammualaikum and good morning my lovely readers 🀍

So today I would like to share to you guys about some of the exercise you can do to improve your relay events technique.


1) Pass the baton in Static.

  • All runners line up, arm extended to maintain proper spacing, only move their arms in running motion. 
  • 1st runner hold the baton. When coach says "UP" the 2nd runner moves arm back to receive the baton. 
  • Runners continue moving arms in a running motion until the coach says "UP" again, at which time the 2nd runner passes the baton to the 3rd and the sequence is. 
  • Then repeated with the next runner. 
Google Image.

2) Pass baton in Dynamic.

  • Pass the baton while running from 1st-4th runners.
  • After the 4th runner recieve the baton, he/she will give it back to the 2nd runner. 
  • Runners make a pass within the designated area.
Google Image.

3) Push Pass Dril.

  • Improve correct hand positioning for recieving the baton.
  • Coach's command of left or right athlete leads with the elbow sliding their hands up the wall with the palm open until pointing downwards. 
Google Image.


These are the example of drill that you can apply for students/athletes out there. May this will help you to improve your relay events technique. Hope to see you soon on another post.  Thank you for your visitπŸ’•


Tuesday, 27 October 2020

RELAY EVENT [4X100 & 4X400]

 Hello, Anyoung haseyo, Hajimemashite, Vanakkam, Ni hao πŸ‘‹πŸ» How are you today? Hope you and your family are doing fine as Covid-19 tears its way through communities across the globe and as fears about the virus and its impact increase. Today I would like to share something about Relay event in Track & Field which are 4x100 & 4x400.


HISTORY πŸ“œ

  • The 1st Penn Relays was held on April 21 1895 in Philadelphia.
  • At the dawn of 20th century, track and field in the United States was centered around 3 large eastern cities of Boston, New York, and Philadelphia.
  • The history as sport began in 1893 at University of Pennsylvania.

EQUIPMENTS πŸ₯‡

1) Appropriate suits.


2) Spike Shoes.

Google Image.


3) Starting Block.

Google Image.


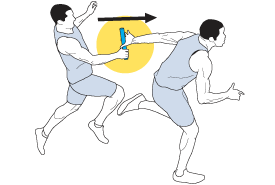
4) Baton.

Google Image.


 RULES & REGULATIONS πŸ“š

A) General Relay Rules Event:

  • Baton can be passed within exchange zone [20 meters long].
  • Passer must remain in their lanes after the pass to avoid blocking other runners.
  • Baton must be carried by hand.
  • Runner cannot wear gloves [better grip of baton].
  • If the baton dropped, it must be pickup by runner itself.

B) Rules for 4x100 meters Event:

  • The outgoing runner must stand in front of Blue line which is in acceleration zone. 
  • Between 2 yellow
    line is handoff zone where incoming runner need to pass the baton in this zone to the outgoing runner.
  • Exchange baton is allowed in the Handoff zone only.
  • The outgoing runner uses 7-8 steps "Go Mark" to start run in acceleration zone. 
  • 1st & 3rd runner will hold a baton on right hand.
  • 2nd & 4th runner will hold on left hand.

C) Rules for 4x400 meters Event:

  • Only 1st runner remains in the same lane for full lap and starting point at the white blue inset line.
  • No ❌ acceleration zone in 4x400 meter event.
  • Runners may only commence running within take over zone.
  • After received the baton, 2nd runner may leave lane after the 1st turn usually marked with green line from lane 2-8.
  • 3rd & 4th runner will start in front of the blue line [10m before finish line and receive baton within take over zone.
  • 3rd & 4th runner are assigned lanes based on the position of the previous runner when he/she halfway the track. 


D) 400 meters Standard Track:

Google Image.


DISQUALIFICATION RELAY EVENT 🚩

      1. Baton is not passed within a changeover zone, based on the position of the baton, not either runner's foot.
      2. False starting 🏁.
      3. Prevent other competitor from passing baton.
      4. Dropping baton and not picked up by the athlete who dropped it.
Google Image.


HANDOFF & ACCELERATION ZONE 🏴

The zone:

  • Acceleration zone must be 10 meters length.
  • Handoff zone must be 20 meters length.

Google Image.

Receiver baton:

  • All runner except 1st runner must make a mark in preparation before the runner are close to them. 
  • 4-6 steps before handoff zone.

Google Image.

Exchange baton:

  • Receiver start running when runner reach the mark.
  • Receiver cannot turn back to recieve the baton when start running.
  • Need to raise hand and runner will pass the baton.
  • Use signal among the reciever and runner [UP] to avoid miscommunication.
  • Reciever must run with full of speed when runner reach the handoff zone until baton was given.

HANDOFF TECHNIQUES :

1)  Push - Pass:
  • Outgoing runner's arm is extend out behind and parallel to the ground.
  • Hand is open with thumb is pointing down.

Google Image.

2) Up - Sweep:
  • Receiving hand is extended behind hip height and palm facing down.
  • A wide angle between thumb and the rest of finger.
Google Image.
3) Down - Sweep:
  • Receiving hand is extended behind hip height with palm facing up.
Google Image.

Alright, done for todayyy. I hope this can help you to learn more about relay event. This knowledge is good for students and teacher so that they can apply it with correct techniques. Hope you guys enjoy this reading. See you on another post 😘.